이전 포스팅에서는 로컬에서 NodeJS 프레임워크 중 하나인 Express를 이용하여 API 서버를 만들 수 있도록 기본적인 환경을 구축해보았다. 사실 내가 이 포스팅을 쓰며 정리하고자 했던 내용은 이제부터 본격적인 시작이 아닐까 싶다.
Typescript 적용하기
이전의 다른 포스팅에서도 여러번 언급을 했지만 나는 서비스 개발 시 Typescript를 이용하여 개발을 하는 것이 서비스의 안정성을 높이는 일이라고 생각한다. 그렇기 때문에 역시나 MOCK 서버에서도 마찬가지로 Typescript를 이용하여 개발할 수 있도록 설정을 해줄 예정이다. 여기에서의 핵심은 클라이언트에서 정의한 모델(Model)에 대한 타입과 서로 타입을 공유하여 MOCK 서버의 응답값(Response)와 타입을 유기적으로 잘 엮어주는 것이다. 하지만 이번 포스팅에서 이러한 내용까지 다루기에는 클라이언트 코드까지 작성해야한다는 번거로움이 있기 때문에 별도로 다루진 않는다. 만약 이러한 상황이 생긴다면 꼭 서로 유기적으로 연결하여 서로의 타입에 대해 실시간으로 검증할 수 있도록 작성하도록 하자(실제 회사에 적용된 MOCK 서버 역시 말한 것과 같이 클라이언트와 모델(Model)에 대한 타입을 공유하여 사용하고 있다.)
변경된 후에는 tsconfig.json 파일을 하나 생성하여 각자의 입맛에 맞는 설정을 추가한다. 이 포스팅에서는 tsc --init 옵션을 통해 생성해주는 기본 tsconfig.json 파일을 사용한다. 만약 tsc 옵션을 사용하고자 한다면 typescript를 전역으로 설치해주면 사용할 수 있으니 참고하도록 하자.
1
$ tsc --init
명령어를 실행시켜주면 다음과 같이 프로젝트의 최상위 루트에 tsconfig.json 파일이 생성되는 것을 볼 수 있다.
{ "compilerOptions": { /* Basic Options */ "target": "es5", /* Specify ECMAScript target version: 'ES3' (default), 'ES5', 'ES2015', 'ES2016', 'ES2017','ES2018' or 'ESNEXT'. */ "module": "commonjs", /* Specify module code generation: 'none', 'commonjs', 'amd', 'system', 'umd', 'es2015', or 'ESNext'. */ // "lib": [], /* Specify library files to be included in the compilation. */ // "allowJs": true, /* Allow javascript files to be compiled. */ // "checkJs": true, /* Report errors in .js files. */ // "jsx": "preserve", /* Specify JSX code generation: 'preserve', 'react-native', or 'react'. */ // "declaration": true, /* Generates corresponding '.d.ts' file. */ // "declarationMap": true, /* Generates a sourcemap for each corresponding '.d.ts' file. */ // "sourceMap": true, /* Generates corresponding '.map' file. */ // "outFile": "./", /* Concatenate and emit output to single file. */ // "outDir": "./", /* Redirect output structure to the directory. */ // "rootDir": "./", /* Specify the root directory of input files. Use to control the output directory structure with --outDir. */ // "composite": true, /* Enable project compilation */ // "removeComments": true, /* Do not emit comments to output. */ // "noEmit": true, /* Do not emit outputs. */ // "importHelpers": true, /* Import emit helpers from 'tslib'. */ // "downlevelIteration": true, /* Provide full support for iterables in 'for-of', spread, and destructuring when targeting 'ES5' or 'ES3'. */ // "isolatedModules": true, /* Transpile each file as a separate module (similar to 'ts.transpileModule'). */
/* Strict Type-Checking Options */ "strict": true, /* Enable all strict type-checking options. */ // "noImplicitAny": true, /* Raise error on expressions and declarations with an implied 'any' type. */ // "strictNullChecks": true, /* Enable strict null checks. */ // "strictFunctionTypes": true, /* Enable strict checking of function types. */ // "strictPropertyInitialization": true, /* Enable strict checking of property initialization in classes. */ // "noImplicitThis": true, /* Raise error on 'this' expressions with an implied 'any' type. */ // "alwaysStrict": true, /* Parse in strict mode and emit "use strict" for each source file. */
/* Additional Checks */ // "noUnusedLocals": true, /* Report errors on unused locals. */ // "noUnusedParameters": true, /* Report errors on unused parameters. */ // "noImplicitReturns": true, /* Report error when not all code paths in function return a value. */ // "noFallthroughCasesInSwitch": true, /* Report errors for fallthrough cases in switch statement. */
/* Module Resolution Options */ // "moduleResolution": "node", /* Specify module resolution strategy: 'node' (Node.js) or 'classic' (TypeScript pre-1.6). */ // "baseUrl": "./", /* Base directory to resolve non-absolute module names. */ // "paths": {}, /* A series of entries which re-map imports to lookup locations relative to the 'baseUrl'. */ // "rootDirs": [], /* List of root folders whose combined content represents the structure of the project at runtime. */ // "typeRoots": [], /* List of folders to include type definitions from. */ // "types": [], /* Type declaration files to be included in compilation. */ // "allowSyntheticDefaultImports": true, /* Allow default imports from modules with no default export. This does not affect code emit, just typechecking. */ "esModuleInterop": true /* Enables emit interoperability between CommonJS and ES Modules via creation of namespace objects for all imports. Implies 'allowSyntheticDefaultImports'. */ // "preserveSymlinks": true, /* Do not resolve the real path of symlinks. */
/* Source Map Options */ // "sourceRoot": "./", /* Specify the location where debugger should locate TypeScript files instead of source locations. */ // "mapRoot": "./", /* Specify the location where debugger should locate map files instead of generated locations. */ // "inlineSourceMap": true, /* Emit a single file with source maps instead of having a separate file. */ // "inlineSources": true, /* Emit the source alongside the sourcemaps within a single file; requires '--inlineSourceMap' or '--sourceMap' to be set. */
/* Experimental Options */ // "experimentalDecorators": true, /* Enables experimental support for ES7 decorators. */ // "emitDecoratorMetadata": true, /* Enables experimental support for emitting type metadata for decorators. */ } }
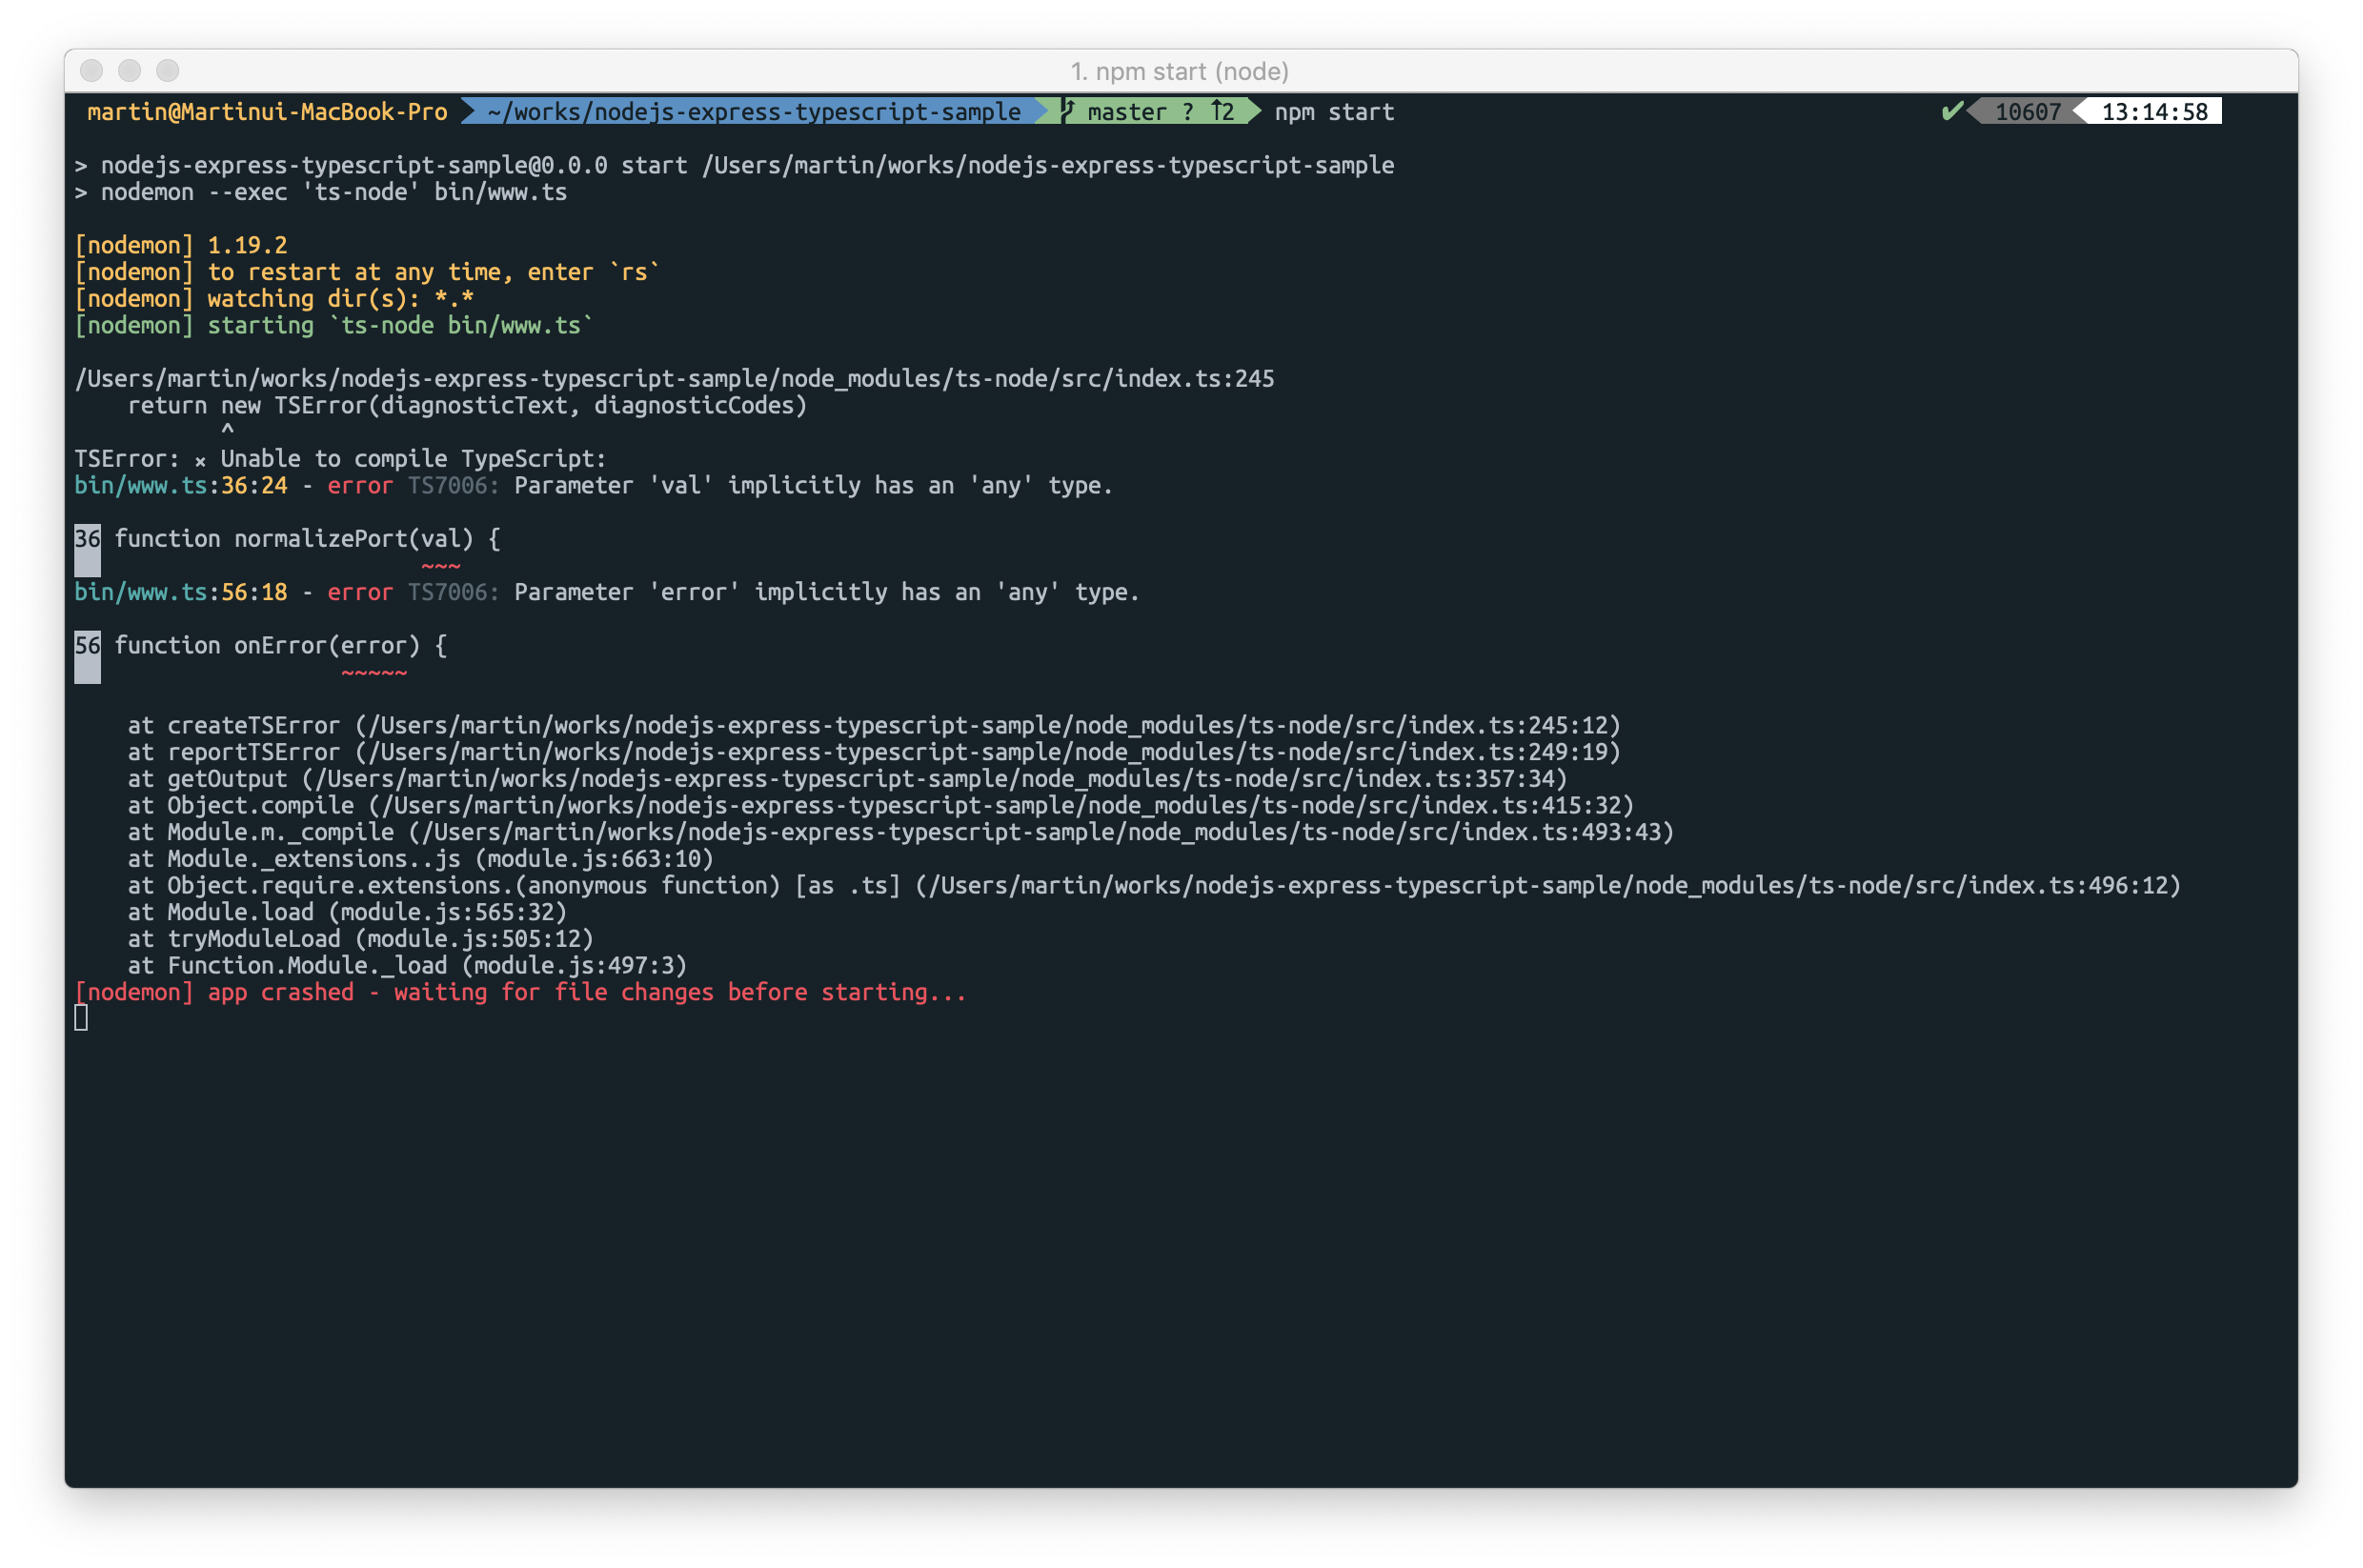
이와 같이 타입스크립트에 대한 config 파일이 생성되었다면 한번 Express 앱을 실행시켜보도록 하자. 만약 이 포스팅과 동일하게 실행했다면 다음과 같이 에러가 발생할 것이다.
이러한 이유는 기존의 Javascript로 작성해준 코드를 Typescript 파일로 변경하면 적어주지 않은 인자에 대한 타입이 지정되어 있지 않아 컴파일시 발생하는 에러이다. bin/www.ts 파일의 normalizePort 함수와 onError 함수의 인자(Parameter)에 다음과 같이 타입을 지정해주면 해당 문제를 해결할 수 있다.
// normalizePort 함수 functionnormalizePort(val: string) { // val 파라미터에 string 타입을 지정한다. // ... } // onError 함수 functiononError(error: ErrnoException) { // error 파라미터에 ErrnoException 타입을 지정한다. // do something }
이와 같은 방법으로 기존에 생성되어져있는 js 확장자를 ts 확장자로 변경하며, 애러를 하나씩 잡아보도록 하자.
샘플 API Entry 포인트 생성하기
현재는 서버가 실행되고 있는 localhost:3000으로 접속하면 Express의 화면이 노출될 것이다. 하지만 해당 포스팅에서 Express는 API 서버로만 이용할 예정이기 때문에 화면(View)나 혹은 스태틱 리소스(Static resource)에 대한 코드는 필요가 없다. 그렇기 때문에 API와 무관한 코드는 모두 삭제해주도록 하자.
1 2 3 4 5 6 7 8 9
// ... // View 템플릿이 위치하고 있는 views 디렉토리와 view 템플릿 엔진을 설정하는 코드를 삭제한다. // app.set('views', path.join(__dirname, 'views')); // app.set('view engine', 'pug');
// 정적 리소스 파일을 서빙(Serving) 해주는 코드 역시 삭제한다. // app.use(express.static(path.join(__dirname, 'public')));
// ...
불필요한 파일을 삭제한 후, routes 디렉토리 안의 index.ts 파일을 아래와 같이 수정한다.
/* GET home page. */ router.get('/', function(req: Request, res: Response, next: NextFunction) { res.json({ title: 'Express' }); });
module.exports = router;
파일을 수정한 후 localhost:3000 디렉토리에 접속해보면 설정한 응답값을 반환받을 수 있다.
Express 앱을 배포할 때는…
Node 서버의 경우 에러 발생 시, 서버가 쉽게 죽어 만약 재시작 되도록 처리되어 있지 않은 상황에서 서비스에 올렸다면 초유의 사태가 생길지도 모른다. 그렇기 때문에 앱을 재시작해주는 프로세스 관리할 수 있는 모듈이 필요하다. 물론 편리한 개발 환경 구축을 위해 Nodemon을 설치하기는 했지만, Nodemon의 경우 development에서만 사용해야 한다. 그래서 실제 NodeJS 기반의 서버를 배포할 때 여러가지 Process Manager 중 하나를 선택하여 프로세스들을 관리한다. 대표적으로 PM2, Forever, StrongLoop Process Manager 등이 있다. (관련 비교 링크) 이 중 꾸준한 업데이트와 모니터링의 편의성, 로깅, 클러스터링 지원 등으로 인해 개인적으로는 PM2를 주로 이용을 한다. PM2는 Process Manager의 약자로서 NodeJS의 프로세스를 관리해줄 프로세스 관리자 중 하나이다. 먼저 간단하게 명령어를 살펴보도록 하자.
1 2 3 4 5 6 7 8 9 10 11 12 13 14 15 16 17
# 1. 프로세스를 실행할 때 # 기본 명령어 $ pm2 start index.js # 애플리케이션의 이름을 지정할 경우 $ pm2 start index.js --name "my-app"
# 4. PM2에 등록된 애플리케이션을 삭제할 경우 $ pm2 delete {application_id}
# 5. PM2 애플리케이션의 상세 정보를 조회할 경우 $ pm2 show {application_id}
간단한 명령어이지만 이러한 명령어들을 추가해주기 위해서는 package.json 의 scripts 안에 한줄로 작성해줘야 한다. 간단한 앱이라면 명령어 한줄로 관리해도 무방하지만 실제 애플리케이션을 PM2를 이용하여 올리기 시작하다보면 적용해야할 옵션들이 많아지고 그 때마다 추가하게된다면 점점더 관리가 힘들어질 가능성이 다분하다. 다행이도 PM2는 이러한 옵션들에 대하여 별도의 설정 파일을 Javascript, JSON 그리고 YAML 형식에 따라 각각 지원한다.
1
$ pm2 ecosystem
위와 명령어를 치면 아래와 같이 ecosystem.config.js 파일이 생성된다. 자바스크립트의 경우 파일명은 큰 상관은 없으나 꼭 끝이 .config.js 로 끝나야 한다.
다만 여기에서 중요한 것은 이 포스팅과 같이 Typescript로 개발된 앱을 서버로 올릴 때는 결국 Webpack을 통해 빌드를 거친 후 서버를 띄우게 된다. Webpack 4의 경우 mode를 통해 ‘development’, ‘production’, ‘none’ 등을 NODE_ENV로 지원을 해주게 된다. 그리고 무엇보다 wepback의 빌드를 거친 후에는 해당하는 값이 변수로 치환되어 런타임에서 결정되는 것이 아니라 String 형태로 변환 되어지기 때문에 PM2의 env 값중 NODE_ENV가 정상적으로 동작하지 않는다. 그렇기 때문에 만약 이러한 값을 설정해주고 싶다면 NODE_ENV가 아닌 다른 값을 통해 환경 변수를 가지고 들어갈 수 있도록 설정을 해줘야 한다.
현재 이커머스회사에서 frontend 개발자로 업무를 진행하고 있는 Martin 입니다. 글을 읽으시고 궁금한 점은 댓글 혹은 메일(hoons0131@gmail.com)로 연락해주시면 빠른 회신 드리도록 하겠습니다. 이 외에도 네트워킹에 대해서는 언제나 환영입니다.:Martin(https://github.com/martinYounghoonKim)